photo home_zpsfb0d8371.png  photo Untitled148dd_zpsc144de96.png  photo about_zps22262d1a.png  photo Untitled148dd_zpsc144de96.png  photo ouftits_zps8b179665.png  photo Untitled148dd_zpsc144de96.png  photo myny_zps3893a639.png  photo Untitled148dd_zpsc144de96.png photo contact_zpse820b3e7.png  photo Untitled148dd_zpsc144de96.png photo ollow_zps8a3519a8.png
Showing posts with label diy friday. Show all posts

Friday, December 20, 2013

Holiday DIY

Happy DIY Friday!Today I'm sharing some seasonal crafts to get you in the spirit without breaking the  bank.


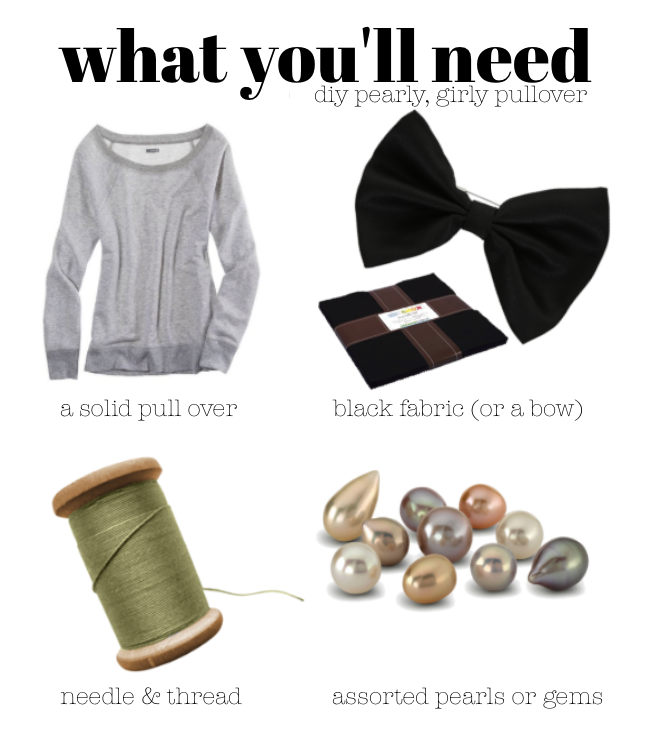
I'm so over Ugly Sweater parties! I've been at least one every year for the past five years ... bor-ring; and worn every ugly sweater under the sun (including one that light up ... pretty epic. But in New York Ugly sweaters can get expensive (especially in the west village!), so when I got invited to an ugly sweater party, but didn't want to spend $30+ on one, I found a literal loophole. With a little glitter glue and a $8 pull over from Old Navy, I was able to create an "ugly" sweater for under $10!

All you need is a pull over and glitter glue! I opted for washable glitter glue so I could remove the "ugly" after the party, but any glitter glue will do. I also turned my sweater inside out for the same reason. If you want to un-ugly your sweater post party, simply soak that sucker in hot water and hand wash it. All of my glitter glue came off with a 30-min soak, and I used a lint roller to removing any clinging sparkle specs. 


My pink ampersand is one of my favorite pieces of wall decor in my apartment (thank big thanks to my amazing friend Katrina who made this for me a few years back, I'm obsessed!). So for the holidays, I paired it with DIY "mix" and "mingle" signs to give it a festive twist!

All you need is a little paint or glitter glue and two canvases, frames or a mix of the two. You might also want to add gold stickers (see mingle) finish your art with a layer of modge-podge to give it that special shine. This project will cost about $10 per piece.


To add a layer of whimsy to your holiday outfit, try using a ornament as a quirky statement earring!
 Simply string a stud through the wire of a small ornament and ta-da, you'll be trim-tastic and ready to go! Oh, and this was the final touch for my Ugly Sweater outfit! I only wore one ornament to compliment my asymmetrical bob, but a set of two works just as well!

 photo cmc_zpsa472da3b.png 

Friday, December 6, 2013

Girly, Pearly Pullover

I'm excited to announce the return of DIY Friday with a girly, pearly twist on a classic pullover as feature in last weeks post: Times Square Tulle
This is an quick, easy and affordable diy (do it yourself), and can even be a "no-sew" project by substituting a needle & thread for safety pins and rhinestone glue. Use an old sweatshirt or pick one up for cheap (mine's from forever 21), and order the pearls or gems online or at your nearest craft store. Also, you can skip a step by buying a black bow via etsy!
Start by creating a black bow out of your fabric square (or using your premade bow) and sewing or pinning it to your sweatshirt (pinning it gives you the option to remove the bow, but make sure to use three pins so it lays flat). After you scatter the pearls to create a pattern, string your embellishments and sew (or glue them) them to your sweatshirt, and presto ... a pearly pullover!
See how I paired mine with tulle for a Carrie Moment in Times Square Tulle!

 photo cmc_zpsa472da3b.png

Friday, October 26, 2012

diy friday: glitter boots

we're over due for another diy friday post & this one is just in time for fall!
since boot season is upon us, this post will help you give your busted boots a glamours makeover so they can see another season!

Friday, August 3, 2012

diy friday: girls who wear pearls

welcome back to another diy friday!
i am really excited to share today's diy tutorial for creating something that every girl should own: a statement pearl necklace!  you can create this look in about five minutes with only a few materials, i even created a quick how to video so you to follow along! first lets look at what you'll need

Friday, July 20, 2012

Friday, July 6, 2012

DIY Friday: Kate Inspired Bow Clutch

hello craft-inistas and welcome to another diy friday!
today's craft project draws inspiration from my favorite brand, you guessed it, none other than the always fabulous kate spade! but before we get started, take a look at the transformation
Here's how I got Inspired...

Friday, June 22, 2012

Diy Friday: Chevron Clutch

Color Me Crafty...
Since I am the self proclaimed queen of crafting (let's be honest, I am just too cheap so I end up doing things myself instead of buying them) I claim this friday and every friday from now on, diy day!
The first DIY project, we are giving this tired old clutch a make over!